
So when searching online for wedding items and ideas, I discovered these beautiful, absolutely blinged the fuck out, bridal bouquets:
 |

And goddammit if I didn't decide I wanted one. But if you click through any of the links, you'll see they are not cheap. I think the least expensive one I found was still over $200. For one small bridal bouquet. Matching bridesmaid bouquets, boutonnieres, etc. are a whole different story.
So I kept searching, and stumbled across several different DIY videos to make your own "brooch bouquet" as these are apparently called. There are even some kits out there with the materials to make your own. I watched about five such videos before deciding I would give this a try (with just a small bouquet) to see if I could do it myself. And in true Leonard fashion, I sort of took the elements I liked from the various videos to see if I could piece them together.
One video involved painting the styrofoam half sphere and covering it with glitter first. And it's literally a brooch bouquet. She glues brooches onto the foam -- and also includes feathers! One video involves gluing satin flowers all over, and then adding the bling on top. And yet another has you put the bling into the center of the artificial flower with floral wire and stick them into the styrofoam.
With the all satin flowers, I didn't like how it looked; it was too symmetrical, the flowers all look the same. And I definitely didn't want the "just brooches" bouquet, and the added feathers -- well, this isn't The Best Little Whorehouse in Texas. Also, two of the three video involved using a wooden dowel (wrapped in ribbon) as the handle; the third uses an actual floral bouquet handle and bouquet collar.
Fail #1: Measurements
Math is hard, y'all. The all-glitter-and-feather-and-brooches bouquet used a 5" diameter styrofoam sphere. Most of the others are in the 8" range. I wanted to start small to practice, so I tried to find the 5" foam. But I couldn't. Plus, all the measurements were weird. They didn't say "5 inches." They said things like "1.9 in. by 3.8 in." What does that even mean?? But that seemed close to five inches? So I ordered it. And I laughed at how wee it was when it arrived.
Please insert your own joke about how women can't measure because men say "this" is six inches here.
 |
| Can you tell? They’re really, really tiny. |
Fail #2: Ribbon Twirling
I attempted to cover my wooden dowel with ribbon. The ribbon is slightly smaller in width than in the videos, I think (another measurement fail); some videos have you cover the dowel with ribbon first, and then glue to the styrofoam; others attach the dowel, then cover it. I went with the former, and as you can see, my ribbon twirling skills need some work:
 |
| It shouldn’t be lumpy like that. And this is before the next fail. |
Fail #3: The Glue Gun Won
When gluing my (poorly) beribboned dowel to the styrofoam, things took a horrible, horrible turn. The glitter & feather video said to use a ridiculous amount of glue. Okay, fine, so I did. And when I inserted the dowel, some of the glue squished out. And my brain said, "You just should spread that around a bit, evenly." So I stuck my right index finger directly into the mess of hot glue. And then the screaming began.
I don't know why I did it! It made sense at the time!!!
And I must have touched my finger to my thumb in an attempt to get the glue off because the pads of both digits ended up with second degree burns (they're still healing now, two weeks later). I could only yell, "HOT! HOT! HOT!" and run, crying, to the kitchen sink to thrust my fingers under cold running water. Le Fiancé asked, "Oh no, did you accidentally touch the metal tip of the glue gun?" But I couldn't make words, let alone explain to him that it was so much worse than that. And I had to peel the drying glue off of both fingers (under the running water) and hope it wasn't also taking skin with it. There was much sobbing and bawling in pain and frustration. That night was one of the longest, most painful I'd ever spent. Just searing, burning, screaming pain radiating from my finger and thumb, especially if I moved them away from the ice pack (wrapped in a towel) I was clutching.
Here's the thing: this is not my first time using a glue gun. I grew up with a mother who was sewing and crafting constantly, and I crafted the shit out of some stuff in the 80s and 90s, most of which involved using a glue gun. But clearly my brain had forgotten some key elements.
Fun fact: this is also not my first major burn on my dominant hand. In 8th grade, I had left my curling iron plugged in for about 4 hours and at the time, had the very bad habit of picking it up by the rod. So I picked it up, seared my right hand, dropped it (almost burning my foot), and ran to the bathroom to again plunge my hand into cold water. I had second degree burns with blisters on every "section" of each finger and my thumb and all over my palm. That night was probably the first night of "I'm in so much pain I can't even sleep" that I've had. At least this most recent time, as an adult, I could self-medicate (and I did!).
- alerted Le Fiancé so he could be on standby.
- made sure to turn it to "Low." (It had previously been on "high." It only has two settings, and no On/Off switch.)
Fail #4: Flower Power
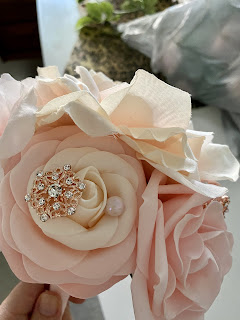
I don't want to say I bought the wrong flowers, because I don't think I did. I bought these flowers by Ling's Moment, and let me tell you, they are beautiful. However, they are not the silk type flowers you find at your local craft store. They are more like foam, sometimes called "real touch" because they do feel velvety, more like the real thing. And the colors in her "Vintage Blush" collection that I purchased were 90% spot-on (the dark "dusty rose" color isn't really in my palette).
But, with DIY Tutorial #3, where we put the brooches in center of some of the flowers, you have to be able to pop off the plastic stem and then thread the floral wire through the flower. With foam flowers, well, it doesn't quite work that way. They're better made than your typical craft store flowers, so the stems don't just "pop off." And 26 gauge floral wire is a bit too delicate to just shove into the foam flower and hope it comes out the other side (trust me, I tried). The wire just starts to curl and bend (rather nicely, I might add) under the pressure.
So I was a little "stuck." My thought process was to then buy some cheap craft store flowers to try the process again and sort of see what happens. I did glue some of my brooches directly on top of the foam flowers, and it looked okay. But I didn't want to do that for the whole bouquet, practice or no. Speaking of the brooches...
Fail #5: All Your Brooches Are Belong to Me
I bought two different packages of rose gold brooches from Amazon, and I made sure they were in different sizes. Visually, you don't want everything to look the same, y'know? You need to break up sizes and shapes otherwise it just looks off. Not that we expect anyone to think these flowers or this bouquet is "real," but you also don't want it to look like it was purchased at a 1980's craft fair. (And believe you me, I went to a lot of those. A LOT. So many crocheted Barbie outfits!)
And yes, while the packages had two different sized brooches, they were nearly all the same shape. Not 100% identical, mind you, but not enough difference in shape and style. At first glance, the eye thinks they're all the same. I kept referring back to the pictures of the professional bouquets (like the ones I shared above, plus others) to identify what I liked about those and how mine was different. And being able to have different shapes/types of brooches and other bling was a big part of that.
So now the plan was to buy more fake flowers, more brooches, more wooden dowels, possibly a bouquet holder if I could find one. The Muppet Man patiently went with me to the Dollar Store and Michael's to pursue my craft extravaganza. He's even gotten proficient at finding items in the right color scheme; I'm so proud.
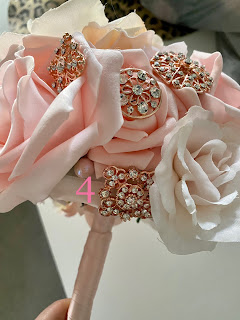
Now let's look at all of my failures put together!


- Wonky ribbon (previously mentioned)
- Exposed styrofoam and some wires.
- More ribbon failures (this time trying to put it along the edge of the half sphere).
- A blank spot? Let's just stick another happy li'l brooch right in there:
- Pearls. I didn't even talk about the pearls in the main list of fails! But they weren't what I expected, so I tried to "sprinkle" them on this rose. It didn't work out exactly. (And you can see the glue).
- through 8. These aren't mistakes. But because I'm me, I decided to add several other (larger) pink pearls like pretty little clitorises because why not?


The Cost of Failure
How much has all of this cost? Wasn't doing it myself supposed to be cheaper than buying? I mean, yes, mostly cheaper. But also a bit more fun (minus the second degree burns and shame) and also a way to be sure to get exactly what I want in terms of color and shape and other details. But for actual cold hard cash, right now I've spent $216.54. And that's including supplies to make a second (real) bouquet, some extra items we purchased while at the Dollar Store and Michael's (unrelated to this project), and the fact that I currently have enough materials to try my hand at making my own boutonnieres and corsages for the wedding party and parents (pictures below). And that's still less (by four dollars) than the cheapest premade bling bouquet I found online. And I know this because I have it all written down in my Wedding Spreadsheet (maniacal laughter).