Saturday, February 26, 2022

Martial Arts & Crafts

Let's talk about my recent crafting failures, shall we?

So when searching online for wedding items and ideas, I discovered these beautiful, absolutely blinged the fuck out, bridal bouquets:


And goddammit if I didn't decide I wanted one.  But if you click through any of the links, you'll see they are not cheap.  I think the least expensive one I found was still over $200.  For one small bridal bouquet.  Matching bridesmaid bouquets, boutonnieres, etc. are a whole different story.

So I kept searching, and stumbled across several different DIY videos to make your own "brooch bouquet" as these are apparently called.  There are even some kits out there with the materials to make your own.  I watched about five such videos before deciding I would give this a try (with just a small bouquet) to see if I could do it myself.  And in true Leonard fashion, I sort of took the elements I liked from the various videos to see if I could piece them together.

One video involved painting the styrofoam half sphere and covering it with glitter first. And it's literally a brooch bouquet.  She glues brooches onto the foam -- and also includes feathers! One video involves gluing satin flowers all over, and then adding the bling on top.  And yet another has you put the bling into the center of the artificial flower with floral wire and stick them into the styrofoam.

With the all satin flowers, I didn't like how it looked; it was too symmetrical, the flowers all look the same.  And I definitely didn't want the "just brooches" bouquet, and the added feathers -- well, this isn't The Best Little Whorehouse in Texas.  Also, two of the three video involved using a wooden dowel (wrapped in ribbon) as the handle; the third uses an actual floral bouquet handle and bouquet collar.

Fail #1:  Measurements

Math is hard, y'all.  The all-glitter-and-feather-and-brooches bouquet used a 5" diameter styrofoam sphere.  Most of the others are in the 8" range.  I wanted to start small to practice, so I tried to find the 5" foam.  But I couldn't.  Plus, all the measurements were weird.  They didn't say "5 inches."  They said things like "1.9 in. by 3.8 in."  What does that even mean??  But that seemed close to five inches?  So I ordered it.  And I laughed at how wee it was when it arrived.

Please insert your own joke about how women can't measure because men say "this" is six inches here.


But that wasn't all.  The wooden dowels, while actually 7" long (heh), were only 0.5" in diameter instead of one inch.....but they actually worked with the teeny styrofoam ball.
And last but not least, these bits of bling.  One of the videos showed gluing rhinestones, etc. to cover any extra space that the flowers didn't cover, so I bought some.  Or so I thought.

Here's what I got:
Can you tell? They’re really, really tiny. 


So we're off to a rocky start, but it's okay 'cause it's just practice! (Right?)

Fail #2:  Ribbon Twirling

I attempted to cover my wooden dowel with ribbon.  The ribbon is slightly smaller in width than in the videos, I think (another measurement fail); some videos have you cover the dowel with ribbon first, and then glue to the styrofoam; others attach the dowel, then cover it.  I went with the former, and as you can see, my ribbon twirling skills need some work:

It shouldn’t be lumpy like that. And this is before the next fail


Fail #3: The Glue Gun Won

When gluing my (poorly) beribboned dowel to the styrofoam, things took a horrible, horrible turn.  The glitter & feather video said to use a ridiculous amount of glue.  Okay, fine, so I did.  And when I inserted the dowel, some of the glue squished out.  And my brain said, "You just should spread that around a bit, evenly."  So I stuck my right index finger directly into the mess of hot glue.  And then the screaming began.

I don't know why I did it! It made sense at the time!!!

And I must have touched my finger to my thumb in an attempt to get the glue off because the pads of both digits ended up with second degree burns (they're still healing now, two weeks later).  I could only yell, "HOT! HOT! HOT!" and run, crying, to the kitchen sink to thrust my fingers under cold running water.  Le Fiancé asked, "Oh no, did you accidentally touch the metal tip of the glue gun?"  But I couldn't make words, let alone explain to him that it was so much worse than that.  And I had to peel the drying glue off of both fingers (under the running water) and hope it wasn't also taking skin with it. There was much sobbing and bawling in pain and frustration.  That night was one of the longest, most painful I'd ever spent.  Just searing, burning, screaming pain radiating from my finger and thumb, especially if I moved them away from the ice pack (wrapped in a towel) I was clutching. 

Here's the thing:  this is not my first time using a glue gun.  I grew up with a mother who was sewing and crafting constantly, and I crafted the shit out of some stuff in the 80s and 90s, most of which involved using a glue gun.  But clearly my brain had forgotten some key elements.

Fun fact:  this is also not my first major burn on my dominant hand.  In 8th grade, I had left my curling iron plugged in for about 4 hours and at the time, had the very bad habit of picking it up by the rod.  So I picked it up, seared my right hand, dropped it (almost burning my foot), and ran to the bathroom to again plunge my hand into cold water.  I had second degree burns with blisters on every "section" of each finger and my thumb and all over my palm.  That night was probably the first night of "I'm in so much pain I can't even sleep" that I've had.  At least this most recent time, as an adult, I could self-medicate (and I did!).

Needless to say, I took some time away from this project for a couple of days.  When I plugged the glue gun back in again, I
  1. alerted Le Fiancé so he could be on standby.
  2. made sure to turn it to "Low."  (It had previously been on "high."  It only has two settings, and no On/Off switch.)
...which brings us to the next fail.

Fail #4:  Flower Power

I don't want to say I bought the wrong flowers, because I don't think I did.  I bought these flowers by Ling's Moment, and let me tell you, they are beautiful.  However, they are not the silk type flowers you find at your local craft store.  They are more like foam, sometimes called "real touch" because they do feel velvety, more like the real thing.  And the colors in her "Vintage Blush" collection that I purchased were 90% spot-on (the dark "dusty rose" color isn't really in my palette).

But, with DIY Tutorial #3, where we put the brooches in center of some of the flowers, you have to be able to pop off the plastic stem and then thread the floral wire through the flower.  With foam flowers, well, it doesn't quite work that way.  They're better made than your typical craft store flowers, so the stems don't just "pop off."  And 26 gauge floral wire is a bit too delicate to just shove into the foam flower and hope it comes out the other side (trust me, I tried).  The wire just starts to curl and bend (rather nicely, I might add) under the pressure.

So I was a little "stuck."  My thought process was to then buy some cheap craft store flowers to try the process again and sort of see what happens.  I did glue some of my brooches directly on top of the foam flowers, and it looked okay.  But I didn't want to do that for the whole bouquet, practice or no.  Speaking of the brooches...

Fail #5:  All Your Brooches Are Belong to Me

I bought two different packages of rose gold brooches from Amazon, and I made sure they were in different sizes.  Visually, you don't want everything to look the same, y'know?  You need to break up sizes and shapes otherwise it just looks off.  Not that we expect anyone to think these flowers or this bouquet is "real," but you also don't want it to look like it was purchased at a 1980's craft fair.  (And believe you me, I went to a lot of those.  A LOT.  So many crocheted Barbie outfits!)

And yes, while the packages had two different sized brooches, they were nearly all the same shape.  Not 100% identical, mind you, but not enough difference in shape and style.  At first glance, the eye thinks they're all the same.  I kept referring back to the pictures of the professional bouquets (like the ones I shared above, plus others) to identify what I liked about those and how mine was different.  And being able to have different shapes/types of brooches and other bling was a big part of that.

So now the plan was to buy more fake flowers, more brooches, more wooden dowels, possibly a bouquet holder if I could find one.  The Muppet Man patiently went with me to the Dollar Store and Michael's to pursue my craft extravaganza.  He's even gotten proficient at finding items in the right color scheme; I'm so proud.


Now let's look at all of my failures put together!


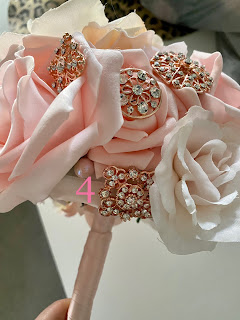
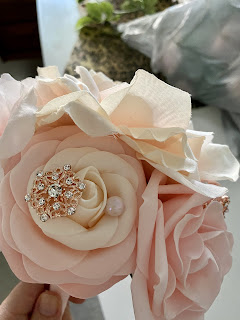
This is actually the 2nd attempt at this practice bouquet.  Because so many of the flowers previously were just stuck into the styrofoam (no glue), I was able to take them out and reuse them, rearrange them, et cetera.

I've numbered the specific places of fail for your convenience.

  1. Wonky ribbon (previously mentioned)
  2. Exposed styrofoam and some wires. 
  3. More ribbon failures (this time trying to put it along the edge of the half sphere).
  4. A blank spot?  Let's just stick another happy li'l brooch right in there:
  5. Pearls.  I didn't even talk about the pearls in the main list of fails!  But they weren't what I expected, so I tried to "sprinkle" them on this rose.  It didn't work out exactly.  (And you can see the glue).

  6. through 8.  These aren't mistakes.  But because I'm me, I decided to add several other (larger) pink pearls like pretty little clitorises because why not?


The Cost of Failure

How much has all of this cost?  Wasn't doing it myself supposed to be cheaper than buying?  I mean, yes, mostly cheaper.  But also a bit more fun (minus the second degree burns and shame) and also a way to be sure to get exactly what I want in terms of color and shape and other details.  But for actual cold hard cash, right now I've spent $216.54.  And that's including supplies to make a second (real) bouquet, some extra items we purchased while at the Dollar Store and Michael's (unrelated to this project), and the fact that I currently have enough materials to try my hand at making my own boutonnieres and corsages for the wedding party and parents (pictures below).  And that's still less (by four dollars) than the cheapest premade bling bouquet I found online.  And I know this because I have it all written down in my Wedding Spreadsheet (maniacal laughter).


Sunday, March 7, 2021

Twilight Terror/Between Dog & Wolf

 I am afraid of the not-dark.

I have long struggled with anxiety around a certain time of day.  It took me many years to even realize it was happening, that there was a sort of pattern; I just thought I didn't like running errands in the late afternoon.

Which brings up another reason why it was hard to pin down:  it's not just the late afternoon.  It's not a time period as in "4 to 6 p.m.," but it's close.  Maybe it's better if I try to describe it by season.

In the winter:  it is late afternoonish, but the sun is still out.  In fact, it glints off the snow in such a way that the reflections seems to hit you directly in the third eye, causing an instant (stabbing) headache.  It's freezing outside, so you're wearing your winter gear, but you are also too hot:  sweating and stuffy inside your layers, both too cold and too hot.  The sun in too bright; the snow is too bright.  And no matter which direction you're headed in traffic, it's always rush hour, and it all hits you directly in the face.

In the summer and fall:  the sun is orange and of course it's hot.  You're stuck in your car for hours, but it never seems to cool off, despite the A/C.  This is the one that really gets me; I can't explain the terror, the throat-closing, dry-mouth-swallowing that accompanies the orange sky.

And you're probably saying to yourself, "That doesn't seem like anxiety.  That sounds like headaches and road rage and your body trying to regulate its temperature."  And you're not wrong.  These are all physical manifestations associated with my twilight terror.

But it's not just when I'm out and about between 2 and 4 or 4 and 6 (depending on the season).

I could be home in my climate-controlled penthouse, and I can still feel the anxiety crawl up my throat like bile.  I will close the curtains to get rid of those headache-inducing slants of sunlight, no matter the season, no matter if they're white or orange.

I will wander aimlessly across the three or four rooms, unsure of what to do with myself.  It doesn't feel "safe" (whatever that means) to sit for too long or to try to start (or work on) a project.  I can't focus; I won't let myself focus lest I stop paying attention to everything else.

For a while (several years or months), I thought I figured it out:  I usually had to be at rehearsal in the evening.  So those few hours in between work and other work (the theatre) were all I had to transition between.  Time for driving, changing clothes, eating food, saying hi and bye to the spouse, then leaving again.

Right?  That must be it.

And even though I like rehearsal (90% of the time; the experiences that make up the 10% are stories for another book), it is still hard to extract myself from home and leave out into the world again.  But it makes sense that I would feel unsettled; can't fully relax when you have to get up and go again.  Can't immerse yourself in another activity lest you lose track of time and end up late (my anxiety over being late is another entry entirely).

Except.

Except...it happens when there is no rehearsal.  It happens when there is absolutely nothing on the calendar (like during a pandemic).  I have to remind myself to breathe.  I have to literally tell myself that's there's nowhere I have to be.  But I still can't settle.  I am still nervous inside my own skin.

And I'm pretty sure I've always disliked this time of day/late afternoon/early evening, long before the days of rehearsals or dinners or evening plans.  Even as far back as 7 p.m. bedtimes and blankies and footie pajamas.

So the other day I watched In & Of Itself on Hulu.  I do recommend watching it; although, I don't want to overhype it (like I feel was done to me).  Many people say it's "indescribable."  I think it's more accurate to say it's difficult to categorize.  If there's a place where theatre, illusion, performance art, and therapy all intersect, In & Of Itself lives there.

The following is NOT a spoiler.

During his one-man show, Derek DelGaudio says there is a certain time of day, when the sun is at a certain point in the horizon, that used to be called "the time between dog and wolf."  The phrase means, because of the direction of the sun, you can't tell the difference between a dog and a wolf (or a friend and an enemy).  And that struck a deep chord within me.  The "golden hour" as DelGaudio said photographers call it (although it's about two hours) sounded exactly like my twilight terror.

And I then wondered that perhaps "my" anxiety isn't "me" at all.  Maybe there's not some triggering event in my past (that I've conveniently forgotten) to explain my daily dread.

Maybe, just maybe, it's something deeper, more primal, than that.  The recognition I felt listening to DelGaudio describe the time between dog and wolf certainly felt primal, almost visceral.  Maybe it's some kind of genetic memory related to the time between dog and wolf.  Some remaining piece of collective memory passed down that says, "This time is dangerous; be careful.  Be on your guard."  Some small piece of genetic material that doesn't know it's the 21st century and is still trying to propel my body to safety by telling my brain to be on high alert until the sunlight changes.

And that's a fascinating idea.  Not only is it fascinating, but it takes the burden off of me.  It isn't "my" anxiety because it's not anxiety at all but a relic of human beings long ago.  It was normal and meant to keep them safe.  Mine is just working overtime by a couple of centuries. Or a few millennia.

Friday, February 26, 2021

InstaPot Beef Stew Recipe

 I got a new recipe for ya!  Well, a version of an existing recipe; I cannot take full credit (hell, I can't even take half credit).  This is what I did with The Salty Marshmallow's Best Ever Instant Pot Beef Stew.  The Salty Marshmallow says explicitly in her recipe that it makes "exactly four servings."  As I'm trying to feed 3 adults for at least two meals (one dinner, one set of leftovers), that wasn't going to work.  So I decided to double the recipe.

But when the Muppet Man came back from the store, he had purchased 2 lbs. of stew meat instead of 3 lbs.  And then I realized that I had only asked for 1 can of tomato sauce instead of two.  But then I also realized that the original recipe said "one 10 oz. can of tomato sauce," and we had one can of 15 ounces.  (dramatic sound cue)  Long story short (too late!), I ended up making 1.5x the original recipe, and it's a good thing, too!  A fully doubled recipe will not fit into a standard 6-quart InstaPot.  I was right at the line for pressure cooking as it was.

So here's what I used/did:

1.5 Recipe of Best Ever Instant Pot Beef Stew

  • 2 lbs. beef stew meat
  • 2 tbsp. olive oil
  • 1.5 tsp of salt
  • 1.5 tsp of pepper*
  • 1.5 tsp of Italian seasoning
  • 3 tbsp. of Worcestershire sauce
  • 4-5 cloves of garlic, pressed
  • 2 small onions (conversely, you could use 1.5 large onions)
  • Approximately 1 pound of carrots, peeled and sliced (let's be honest: I wasn't really measuring the veggies at this point, and for that I apologize)
  • Approximately 4 (maybe 5?) golden potatoes, cubed  (again, I'm sorry)
  • 2 celery stalks, sliced
  • 4 cups beef broth
  • 1 bay leaf
  • 1 15 oz. can of tomato sauce
  • 2 tbsp. cornstarch
  • 2 tbsp. cold water
Directions:
  1. Put 2 tbsp. of olive into the InstaPot and turn on the Sauté function.
  2. When oil is hot, add the garlic and onions and sauté for 1-2 minutes.
  3. Then add the 2 lbs. beef stew meat to attempt to sear the beef.  I say "attempt" because the beef won't all be on the bottom of the pot at the same time; you'll need to stir.
    • Add the salt, pepper, and Italian seasoning right after you add the beef.
    • Continue to sauté/sear (whilst stirring) for approximately 5 minutes.
  4. Turn off the Sauté setting.
  5. Add 4 cups of beef broth to the pot, and use a wooden spoon (or your preferred implement) to scrap up any browned bits from the pot (basically, deglaze).
  6. Add the carrots, potatoes, celery, tomato sauce, and bay leaf to the pot and give it another stir or two for good measure.
  7. Close the InstaPot lid use the Pressure Cook setting for 35 minutes.
  8. Allow pressure to naturally release for 10 minutes before pressing the Quick Release button.
  9. Be careful when you take off the lid!  The liquid will be boiling.
  10. Mix together the cornstarch and cold water (make a slurry) then add to the still-hot stew to slightly thicken.
  11. Remove the bay leaf at any time.
  12. Eat the yumminess.
*My sister claims (and I partially agree) that this was very "peppery."  Next time, I may only use 1 tsp. of ground black pepper, perhaps less.

We didn't have any at the time, but I bet some biscuits would go great with this stew.

Kitty Biscuit Print by Kim Parkurst via Etsy


Sunday, October 25, 2020

Chicken Pot Pie Soup Recipe

 It is exactly like it sounds, friends:  chicken pot pie, but in soup form.  The original recipe is from Six Clever Sisters and includes a recipe for adorable looking "Flaky Pie Crust Leaves" which I absolutely did not make because I'm lazy.  I "made" some Pillsbury Grands biscuits instead.  Her (their?) recipe is below, with my edits & notes in italicized bold.

Word of caution:  this is not a recipe for when you're in a hurry.  I think from start to finish, including cooking (and "cubing") the chicken breasts to scooping the soup into my bowl, this took me about two hours.  But I had plenty of time.

You Will Need:

  • 3 12 oz. packages of frozen mixed vegetables (I used 2 16 oz. packages because math.)
  • 2/3 cup margarine (I used butter; does anyone use margarine anymore?)
  • 2/3 cup flour
  • 1 cup diced onion
  • 1 tsp. salt
  • 1/2 tsp. black pepper
  • 1/2 tsp. Herbs de Provence
  • 1/2 tsp. dried parsley
  • 4 cups chicken broth
  • 3 cups milk
  • 1 1/2 lbs. boneless skinless cooked chicken breast, cubed (I used 3 breasts because who has a scale to measure?  Approximately three cups' worth.  I cooked them from frozen in the InstaPot with some salt and pepper and poultry seasoning.  If your cooked chicken is unseasoned, you might add 1 tsp. poultry seasoning to the soup itself.)
  • 3 tbsp. cornstarch (I only used 1 tbsp.  More on that later.)
Instructions:

  1. Rinse frozen vegetables in cold water to separate; drain.
  2. Melt margarine in large “soup pan” over medium heat. (This is a one pot recipe, so make sure your pot will be able to hold 10 cups of soup).
    • I worried about this note from Six Clever Sisters, so I used the Googles and did some math.  If you have a six-quart stock pot/soup pan, you'll be fine; six liquid quarts equals 24 US cups.)
  3. Stir in flour, onion, salt, and pepper. Cook, stirring constantly, until mixture is bubbly; remove from heat.
    • (How can a mixture that is pretty much a paste -- the beginnings of a roux [equal parts flour and melted butter] -- get "bubbly"?  It doesn't, not like a liquid would. I kept stirring until it was sort of bubbly/sizzly from the heat on the bottom, then continued on.)
  4. Stir in broth and milk. Heat to boiling, stirring constantly. 
    • (I think I should have turned up the heat to medium high here, and this part wouldn't have taken quite so long.)
  5. Boil and stir 1-2 minutes, until thickened. Stir in chicken and vegetables. Simmer until mixture starts to boil.
    • (This is where I tasted it and decided I wanted a tad more seasoning, so I add the 1/2 teaspoons each of Herbs de Provence and parsley, and I don't regret it.  A person could maybe even do a full teaspoon of each.)
  6. Mix cornstarch with a little cold water until blended. Slowly add to soup while stirring. Boil until desired thickness is achieved. (For a thinner soup, use less cornstarch; for a thicker soup, use a little more.)
    • (My soup was plenty thick for my taste at this time, so I only used 1 tbsp. of cornstarch with some water and stirred it in.  Also, the soup will continue to thicken a bit as it cooks in the next step.  And your leftovers the next day will be SUPER thick when you go to reheat, FYI).
  7. Reduce heat to low-medium and let cook for 30 minutes, stirring occasionally. 
    • (This is where I turned on my oven for the Pillsbury rolls and baked them; the timing was almost spot-on, if I do say so myself.)
  8. Optional: Add 1/4-1/2 cup half and half for extra creaminess.  (I didn't do this.)
We ate it with the biscuits, and it was fucking delicious.  The Muppet Man even mentioned something about wanting to "put a ring on it" if I continue to make this soup.  Eat and enjoy.  Your stomach will thank me, even if your waistline won't.

No kittehs were involved in this recipe.


Friday, October 16, 2020

Chicken Tortilla Soup Recipe

 OMG YOU GUYS!  I made chicken tortilla soup last night for the first time EVER, and it was fucking delicious!  This is a big deal for me; however, I refuse to become one of those food bloggers where you have to read their whole damn life story before getting to the recipe.  So recipe first!  I'll write separately about my cooking baggage.

This is a combination of these two recipes:  Delish's "Best Instant Pot Chicken Tortilla Soup" and Spend With Pennies' Chicken Tortilla Soup.  Comments on the former said it was too watery and bland, but I wanted to use my new InstaPot, so I combined the best parts of both (and I don't like improvising!).  If you don't have an InstaPot, I would just follow Spend With Pennies' recipe; I imagine you'll get a similarly delicious result.  So here we go.

You'll need:

  • 2 large chicken breasts, thawed
  • 2 tbsp. olive oil
  • 2 bell peppers, chopped
  • 1 poblano pepper, chopped
  • 1 onion, chopped
  • 3 cloves of garlic, minced
  • 1 tsp. ground cumin
  • 1 tsp. chili powder
  • 1 tsp. oregano
  • Salt & Pepper to taste
  • 3 cups chicken broth
  • 1 (14 oz.) can of crushed or diced tomatoes
  • 1 can of diced tomatoes with chilis (like Rotel)
  • 1 (14 oz.) can of black beans, drained
  • 1 cup corn, drained if canned (I had a small can and used the whole thing, didn't measure)
  • Juice from one lime
  • 1/4 cup cilantro, chopped
Optional for garnish/serving:
  • Tortilla strips -- both of the recipes above include instructions on how to make your own crispy tortilla strips (one baked, one fried). You can also use tortilla chips.  We happen to love these chili lime tortilla strips made by Texas Toast (they're also excellent on salads).
  • 1 avocado, sliced (I didn't do this)
  • Additional cilantro (I didn't do this)
  • Shredded Monterey Jack cheese (I didn't do this)
Instructions:
  1. Turn InstaPot to Saute setting and heat the 2 tbsp. of olive oil.  When oil is hot (shimmering), add all peppers and onions.  Saute until veggies start to soften (5 minutes), stirring occasionally.
  2. While onions and peppers are cooking, generously salt & pepper your chicken breasts.  Also make sure your canned items are opened, drained where necessary.
  3. After 5 minutes of sauteing, stir in the garlic, oregano, cumin, and chili powder.
  4. Add the salt & peppered chicken breasts to the pot.
  5. Add these ingredients to the pot:  chicken broth, lime juice, both cans of tomatoes, black beans, and corn.
  6. Close lid and set InstaPot to Soup setting; set the timer for 7 minutes.
  7. When the InstaPot cooking has completed AND the air has been naturally released (don't use the quick release option), open the lid (carefully) and, using tongs, remove the two chicken breasts onto a plate or cutting board.  Shred the chicken (using two forks, or a fork and knife, or this weirdly efficient way using an electric mixer).
  8. Stir shredded chicken and 1/4 cup cilantro back into the soup pot.
  9. Serve!  Eat!  Enjoy!
I will be eating some of my leftovers today for lunch.  If you want some additional texture, you can stir cooked rice into your bowl with the soup (the Muppet Man did and greatly enjoyed it).


Thursday, October 1, 2020

Letter to My Family

 This email has already been sent, but I want to record this for posterity.

Hello family!


I have a favor to ask of you.  I try not to get into "political discussions" with y'all as it's too upsetting, but now I have to ask for a favor.

If you plan on voting for the person currently in the Oval Office, whether for the first or second time, come November, please, please, please, do me a favor and delete my contact info from all of your sources.  I can no longer in good conscience remain in contact with people who vote to actively hurt me.

I won't be entertaining replies to this email, as I have no desire to discuss my humanity as some "political debate."  As I said to my father (one of the last things I said to him, actually), these are not abstract political ideas that I have the privilege of debating at a distance; they are very real, concrete items that affect and impact my everyday life.

I'm also not trying to change anyone's mind as I imagine we've all pretty much decided what we're going to do.  If you're unable to see the irreparable harm being done to me and the hundreds of thousands of people just like me -- women, women with uteruses, women who've been sexually assaulted, LGBTQ people -- then it's just willful ignorance at this point, and nothing I say will make a difference.

If you're not planning on voting for the person currently occupying the Oval Office, whether for the first or second time, THANK YOU!  And I'll see you on the other side of this election.

To everyone else, thank you in advance for doing me this favor.  And bonne chance in this dystopian hellscape you've helped to create.

Your daughter/niece/cousin/token feminist and queer person,

Only my mother has replied (even though it said I won't be entertaining replies) because she often feels like rules don't apply to her.  Her first response was to say "very nicely worded."  And her second was to tell me that "voting is a private matter" and that I "need to toughen up more."

In other news, no need to drive up to Iowa for Christmas.  Or ever. 


Monday, September 21, 2020

The Address (Book Review)

The AddressThe Address by Fiona Davis
My rating: 4 of 5 stars

While The Lions of Fifth Avenue has the better title, The Address may have the better plot. While I definitely appreciated all of the facts about the New York City Public Library in the former, I was often distracted by what I felt were inconsistencies in the historical settings; by contrast, The Address doesn't seem to offer up nearly as many factoids, but the timelines are spot on.

One may consider Davis' novels to be a bit formulaic: two women on two different ends of history, one (real) historic building connecting them, with a mystery across decades/centuries to solve. So far, though, the mysteries are not the same, and The Address provided some extra twists that I did not anticipate. And everyone knows it's the above formula that counts, it's the "how" -- how we get there, how the stories connect, etc. Davis seems to have that aspect well in hand.

As with Lions, The Address has an undercurrent of (much appreciated and respected) feminism throughout, much subtler, actually. And she deals with classism as well.
I also like that her main characters are well-rounded. 

**SPOILER**


When we get to the final reveal, our villain isn't a villain with one huge deep dark secret that drops like a bomb; it's a series of "smaller" items that add up to make him not the person we thought he was. I don't think he's 100% bad in way that would seem cliche or stereotypical; that might feel anticlimactic to readers, but I appreciate the nuance.

This novel doesn't exactly have a happy ending; it's far more tragic than The Lions of Fifth Avenue, in my opinion.


I've borrowed Davis' other novels from my local library, and at least one of them does not deal with two women on opposite ends of the century; it will be interesting to see how Davis deals with the shorter timeline(s).

View all my reviews